Getting Started #
Covers how to set up a build environment for contributing to FreeCAD
Working on FreeCAD is similar to working on many other open-source projects. This guide provides a short overview of the process. Much more information can be found at https://wiki.freecad.org.
Build Environment #
To work on FreeCAD, you will need CMake, git, a code editor, a C++ compiler, and a Python interpreter. Many different combinations work:
- On Linux, it’s common to use vim, emacs, KDevelop, or CLion as your editor. Compilation with GCC and Clang is supported.
- On Windows, we support Visual Studio, Visual Studio Code, and CLion for development, all using the MSVC compiler toolchain.
- On macOS, you will need to install the XCode command line tools, and you can use XCode, Visual Studio Code, or CLion as your editor.
Other combinations may work as well; these are just the ones that you will be able to get help with most readily on the FreeCAD Forum.
Dependencies #
See also Dependencies
FreeCAD depends on many other open source projects to provide the basic foundations of the program. There are many ways of installing these dependencies: for details and the complete list, see the following Wiki pages:
- Linux: https://wiki.freecad.org/Compile_on_Linux
- Windows: https://wiki.freecad.org/Compile_on_Windows
- Mac: https://wiki.freecad.org/Compile_on_MacOS
Pixi #
One of the easiest ways of creating a standalone FreeCAD build environment with its dependencies in a way that does not affect the rest of your system is to use Pixi.
- Install
pixiusing the following command:
- Windows (PowerShell):
iwr -useb https://pixi.sh/install.ps1 | iex - Linux/macOS:
curl -fsSL https://pixi.sh/install.sh | bash
-
Configure FreeCAD for your platform. There are additional steps necessary on Windows, outlined in the next subsection.
pixi run configure -
Build FreeCAD
pixi run buildIf your computer has less ram than is necessary to run a compiler per processor core, then you can reduce the number of parallel compiler jobs. For example, if you wish to limit to 4 parallel compiler processes, use the following command:
pixi run build -j 4 -
Run FreeCAD
pixi run freecad
Pixi will take care of all the dependencies. In general, there will be no need to re-run the configure command as it will be automatically run by pixi run build if needed. However, there may be times when a git submodule is added or updated. To integrate these changes, the command pixi run initialize will run the commands necessary.
Pixi on Windows #
Pixi uses the conda-forge packages, including the compilers meta package to bring in the platform-specific compiler support. On Windows, it is expected that Microsoft Visual C++ has been installed and matches the version used by the conda-forge team, which is Visual Studio Community 2022.
The Visual Studio Installer may be used to install Visual Studio Community 2022 alongside newer versions of Visual Studio. Ensure all of the necessary components are installed:
- Open the Visual Studio Installer
-
Click
modifyfor Visual Studio 2022.
-
Make sure to select
Desktop development with C++under theDesktop & Mobilesection. Ensure that the necessary optional items are selected on the right.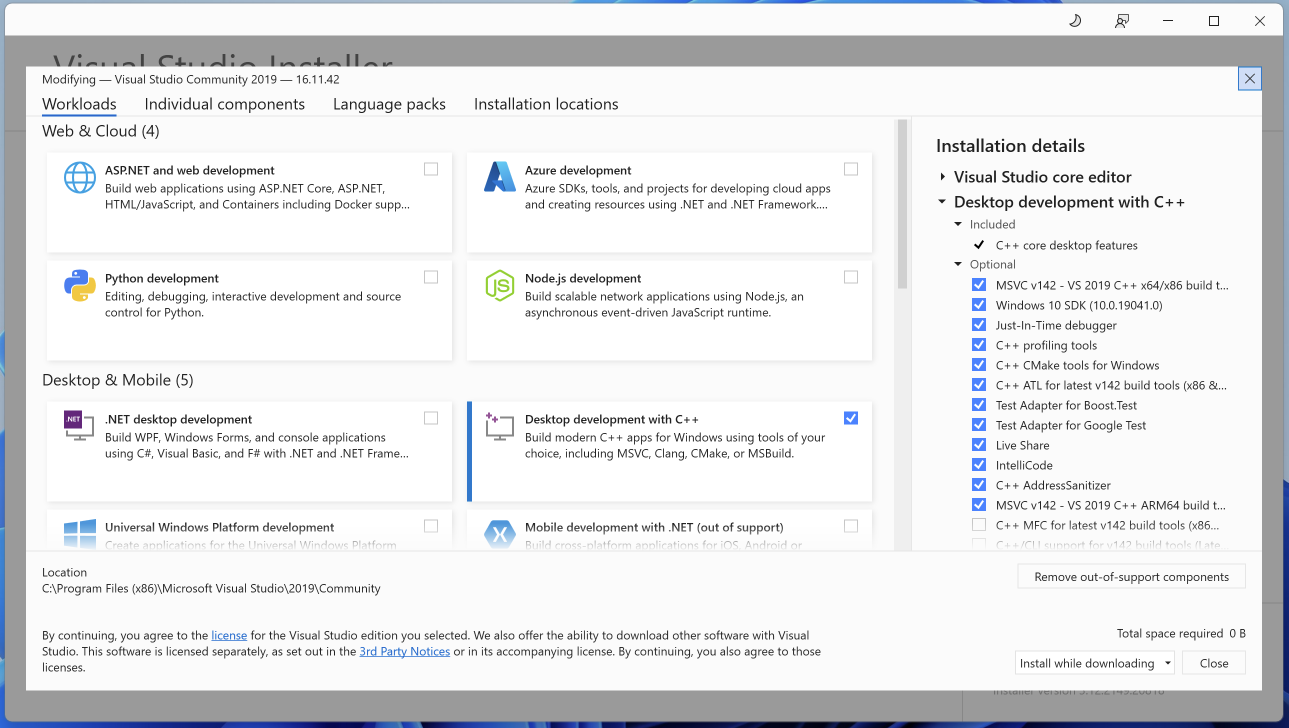
Setting up for Development #
- Fork https://github.com/FreeCAD/FreeCAD on GitHub
- Clone your fork: for example, on the command line, you can use
git clone --recurse-submodules https://github.com/YourUsername/FreeCAD FreeCAD-src -
Set up
pre-commit(our automatic code-formatter and checker):- Install
pre-commit(either using your system package manager or pip):- Debian/Ubuntu:
apt install pre-commit - Fedora:
dnf install pre-commit(Fedora) - Arch Linux:
pacman -S pre-commit - Other (pip in PATH):
pip install pre-commit - Other (pip not in PATH):
python -m pip install pre-commit
- Debian/Ubuntu:
- On a command line, change into your FreeCAD clone, e.g.
cd FreeCAD-src - Run
pre-commit install(orpython -m pre-commit install, depending on your PATH)
- Install
-
We strongly recommend doing an out-of-source build, that is, building FreeCAD and putting all generated files in a separate directory. Otherwise, the build files will be spread all over the source code, and it will be much harder to sort out one from the other. A build directory can be created outside the FreeCAD source folder or inside:
mkdir buildcd build
- Run CMake, either via the CMake GUI or on the command line. See the wiki compilation page for your operating system for a detailed list of options.
-
CMake will generate project files that can be read by your IDE of choice. See your IDE’s documentation for details. In general:
- On Linux, compile with a command like
cmake --build /path/to/FreeCAD-srcrun from your build directory ( orcmake --build ..if your build directory is inside FreeCAD-src). - On Windows with Visual Studio, build the “ALL_BUILD target” (you will have to change the path to the final executable the first time you try to run that target).
- On Mac, on the command line, use
cmake --build /path/to/FreeCAD-srcfrom your build directory, or if using CLion, be sure to “Build All” the first time you run.
- On Linux, compile with a command like
-
If you plan on submitting a PR, create a branch:
git branch fixTheThinggit checkout fixTheThing(or both commands in one go:git checkout -b fixTheThing)
Running and Debugging #
Finding Tasks to Work On #
The GitHub issues tracker contains a ‘Good First Issue’ tag. Filtering by this tag will show issues that are well suited for new contributors. Try to find an issue that seems like an obvious win. If your issue seems unclear or complex, and you’ve given it a good shot, consider asking for help on Discord or the Forum before investing too much time (see below).
Please note: While existing contributors try their best to be helpful, open source projects attract many first-time contributors, many of whom may not stick around for long. As such, existing contributors have limited time to help all newcomers. Please don’t be offended if your questions go unanswered. Your contributions are still appreciated.
For subsequent issues:
- Keep an eye on the GitHub issues (see below)
- Fix issues / make improvements that you notice in your own usage of FreeCAD - ensure they haven’t already been fixed in latest dev!
- Ask on the Discord (see below)
Collaborating with Others #
There are four main places to collaborate with other FreeCAD developers:
- GitHub Issues: Useful for tagging specific people for discussions related to a particular issue
- Discord: More free-form and general development discussions, and longer-term planning
- FreeCAD Forum (Particularly FreeCAD Development subform): Useful for reaching a wide audience + non-dev users, but typically not active for actual development discussions
- FreeCAD Development Meetings: Weekly/Monthly meetings for discussion of development work
Submitting a PR #
The basic process is:
- Write some code (and possibly some unit tests)
git add file1.cpp file2.cppgit commit -m "Sketcher: Fixed bug in constraints" -m "Added foo to bar. Fixes #1234."- When running
git commit, our pre-commit hooks will run to check your code. If the scripts have to make changes, you will need togit addthe changed files and rungit commitagain.
- When running
git pushto send your changes to GitHub- Visit https://github.com/FreeCAD/FreeCAD – at the top of the screen, you should see a yellow banner suggesting you create a Pull Request. Follow the instructions on the site to get the process started.
For PRs that are larger and consist of multiple commits and are larger of size, see the Rebasing section.
PR Review Process #
Maintainers review PRs on a rolling basis throughout the week, and also in a more concentrated review meeting on Mondays (see the FreeCAD Events Calendar for the exact date and time in your timezone). When reviewing, Maintainers strive to uphold the tenets of the CONTRIBUTING.md document. These meetings are open to the public, and all developers are welcome to attend. If you have a PR under review, you may be able to accelerate that process by being present to address any questions or concerns that arise. You can also participate in the process by reviewing PRs yourself. Although only Maintainers may merge PRs, anyone is welcome to test and provide feedback, and Maintainers take that feedback into consideration when evaluating PRs. Any time you can contribute to the project is appreciated!
To expedite the PR review process, consider the following guidelines:
- If your PR is still a work-in-progress, please mark it as a “Draft” so that Maintainers don’t spend time reviewing something that is not yet ready to be merged.
- If you get a question on your PR, it is unlikely to be merged until you respond to that question (particularly if the question is from a Maintainer).
- The PR review meeting proceeds by going linearly through a manually curated list of ready-to-review PRs: the goal is that no under-review PR ever sits for more than a week without action.
- Adding automated tests (in Python or C++) can greatly expedite the review process by providing a clear demonstration of how the new code works and what problem it solves.
- A good description in your PR’s submission text helps Maintainers determine who is best suited to evaluate a PR, and prevents wasting time sorting through the code itself to figure out who should be looking at it.
- FreeCAD’s Maintainer team is currently quite small, and sometimes the Maintainer responsible for a certain part of the code is unable to attend the review meeting: this sometimes unavoidably delays the merge process through no fault of the submitter. We ask for your patience as we work to grow our team.
- It helps the merge process if you can ensure you have a clean commit history in your PR, squashing any intermediate work and only retaining separate commits for logically separate parts of the PR and not merging the main branch into your branch PR (in most cases, we hope that this is only a single commit, see Rebasing for more information).
Rebasing #
The PR queue of FreeCAD can become quite lengthy. This may mean that it takes some time for reviewers to get to review and merge your PR. This can be frustrating especially for the larger PRs that consist of multiple commits because after some time those PR can become outdated because of other smaller PR that have been merged.
In this section, we give some do’s and don’ts for rebasing and to make sure your work can remain up-to-date without much effort.
Do’s #
- Small PRs: Smaller PRs are much easier to rebase.
- Clean commit history: A clean and logical commit history not only helps the review process (as mentioned above), it also helps rebasing where the rebase maintains the logic.
- Amend the logical commits: When rebasing, amend the logical commits updating them in such a way as if they were originally written on the updated main branch. The benefit is that if you need to do a new rebase, you only need to solve the new conflicts and not the old ones again (see don’ts 1 and 2).
*  (main) Core: Update feature 1
*  Gui: Improve the 3D view
*  Sketcher: Update the solver
| *  (my-pr) Test: Add a test for MyModule
| *  Gui: Add Gui support for MyModule
| *  MyModule: Add the new feature
| *  Core: Add support for a new MyModule feature
|/
*  PartDesign: Fix bug #23
*  ...
A rebase should give this:
*  (my-pr) Test: Add a test for MyModule
*  Gui: Add Gui support for MyModule
*  MyModule: Add the new feature
*  Core: Add support for a new MyModule feature
*  (main) Core: Update feature 1
*  Gui: Improve the 3D view
*  Sketcher: Update the solver
*  PartDesign: Fix bug #23
*  ...
In this example, all conflicts are resolved and stored in the original logical commits with amends to those commits. It is as if the PR has been based on the new main. The command to use is: git rebase -i (interactive).
Don’ts #
- Merge main into your PR branch: This effectively adds a new (merge) commit that captures an update to your PR given changed circumstances. This does not follow rule 2. “Clean commit history” because it is not a “logical” commit. The merge commit has nothing to do with your work, but has only to do with changed circumstances. This means that if you need to rebase the PR on top of main, you need to replay all those commits onto main. This effectively means that you are rebasing your work multiple times.
- Create commits to update to a new main branch: This follows the same reasoning as above. It is not a logical commit belonging to the work, which means that each time you need to do a rebase, you need to solve conflicts again and again for the earlier commits.
The following git history for my-pr is not a clean, logical history:
*  (main) Core: Update feature 1
*  Gui: Improve the 3D view
*  Sketcher: Update the solver
| *  (my-pr) Fix the test
| *  Test MyModule
| *  Make the Gui really work
| *  Make the Gui work
| *  Fix issue in core
| *  MyModule: Add the new feature
|/
*  PartDesign: Fix bug #23
*  ...
Adapting to the new main branch should not look like this:
*  (my-pr) Fix for the rebase
*    Merge branch 'main' into my-pr
|\
| *  (main) Core: Update feature 1
| *  Gui: Improve the 3D view
| *  Sketcher: Update the solver
* |  Fix the test
* |  Test myModule
* |  Make the Gui really work
* |  Make the Gui work
* |  Fix issue in core
* |  MyModule: Add the new feature
|/
*  PartDesign: Fix bug #23
If you would now rebase my-pr onto main, you would need to solve all conflicts again that are stored into commits “Merge branch ‘main’ into my-pr” and “Fix for the rebase” because all the commits of my-pr are still based on “PartDesign: Fix bug #23”. So, having a commit history like this can lead to much double work in making your PR up-to-date with a newly updated main branch.